How to Migrate G Suite to Office 365 – Experts Solution
Are you searching for how to migrate G Suite to Office 365 solution? Well, many ways are available to move G Suite business to Office 365 accounts. Don’t worry we will help you to find out the best solution as per your requirements in the below section.
Table of Content
“Hi, I am in charge of migrating a small business G Suite data to the Office 365 domain. My primary objective is to find a way to move over all the mailbox data to O365. Although contacts and calendars are secondary objectives, I would like to move them over at the same time as emails, if possible. My question is how do I automate the process so that the end users don’t have to do anything? I would also like to minimize any sort of disruptions that may arise. Thank you!”
So let’s get started!
Also Read: Google Apps vs Office 365 for Small Business: Which One is Better?
Why Should Users Need to Migrate G Suite to Office 365?
There are several reasons why users need to migrate G Suite to O365. Some of them are listed below:
- It can secure your Data and Files with all SharePoint.
- Scalability and Flexibility for your Businesses.
- Provides better productivity and On-the-Go Access.
- Offers various applications like Google Voice, Gmail, Google Sheets, and so on.
Now, we are going to discuss two different solutions that help you migrate your G Suite into single or multiple Office 365 accounts. So, firstly we move towards the Professional tool and then move to the manual method to solve your issues.
Method 1: Professional Approach to Migrate G Suite Business to Office 365
Note: This method automates the entire migration process. It is possible to migrate emails, contacts, calendars and documents at the same time without the need of end-users involvement.
Because this migration can impact organizations in a negative manner if the data is to go corrupt or take a lot of time to complete, it is highly recommended to opt for a proven, enterprise solution, i.e., Revove G Suite to Office 365 Migration Tool. It is the perfect tool that helps to migrate Google mailbox to Office 365 account in just a few clicks. You can find the free version of the software here:
You can easily migrate all or selected G Suite business users to Office 365 with this utility. The tool is fast and ensures the complete safety of your data. Now, follow the below working steps of the automated tool without losing any data.
Working Process Explained of the Tool
1: Launch and Install the G Suite to Office 365 Migration Tool.

2: Now, select “Categories” and apply filters

3: Fill the source details and validate

4: Finally, you have successfully validated your Office 365 account, fetching users.

Also read: A Step by Step G Suite Email Migration Guide
Method 2: DIY Solution to Migrate G Suite to Office 365 Account
Note: This is a DIY method provided by Microsoft for the migration. It is possible to migrate only emails as it uses IMAP technology.
Manual methods are the most commonly adopted method by users. The main reason for this is that manual methods are free of cost. But at the same time, it is better to keep in mind that there are high chances of data loss also. Anyway, follow these 6 steps to manually transfer Google business into an Office 365 account.
Step 1: Domain Verification
- Initially, you must have to verify to Office 365 that you own a domain used for G Suite accounts.
Step 2: Create and Add Users to Office 365
- You can either add single or multiple users to MS Office 365 as per their requirements.
- From the Admin Center, you can choose Users >> Active Users. Then, go to More option and select Import Multiple Users
- For Single User, go to Add a User option and enter the values manually. For multiple users, click on Import Multiple Users options to download the excel sheet and use it as a reference to add a user
- After arranging the Excel sheet, you need to click Browse button under Create and Upload File screen
- At the end, click on the Verify option. After getting a confirmation message, press Next button
Steps 3: Create a Migration List that Contains Gmail Mailbox
When creating the export file, make sure you know the password of Gmail mailboxes that you want to export. The temporary passwords are assigned to each mailbox at the time of migration. You must be an admin of G Suite to reset the password that is assigned to each mailbox. Also, during the G Suite to Office 365 migration, you can transfer mailboxes as bulk.
-
- Now, login to G Suite admin console using the administrator credentials, i.e., username and password.
- Select Users and, then choose the list of users from the Google admin center.
- Choose users to identify their email address and note down it.
- Then, sign in to Office 365 Admin Center and select Users >> Active Users.
- After that, you can start to create Excel and then, enter the credentials like email address, username, and password for each mailbox you need to migrate (enter a single mailbox per row)
- Save it as CSV format and close MS Excel
![]()
Step 4: Create Migration Endpoint with Gmail IMAP
To migrate G Suite to Office 365 successfully, Office 365 requires to connect and communicate with G Suite. For this, Office 365 will use the migration endpoint.
-
- Open the Exchange Admin Center, go to Recipients >> Migration >> More >> Migration Endpoints
- Then, click on New+ option to create the new migration endpoint
- Select IMAP under the Select migration endpoint type page
- On the IMAP migration configuration page, you need to set the IMAP server to imap.gmail.com and keep all the default settings the same.
- Click the Next button. Next, the migration service will use settings to check the connection to the Gmail system. Now, the Enter General Information page appears if the connection works
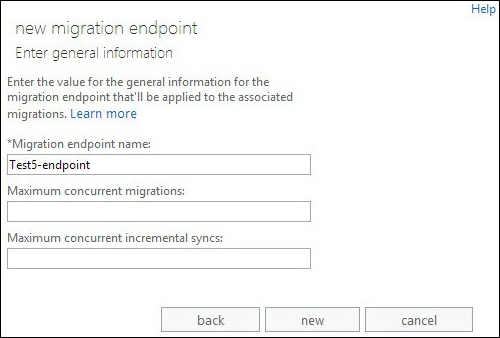
- Under the Enter General Information page, enter the name of the migration endpoint. Leave the 2 boxes blank to use default values and click New to make the migration endpoint

Step 5: Move Google Apps to Office 365 by Creating the Migration Batch
-
- In the Office 365 Admin Center, select Admin Centers and Exchange option
- Under the Exchange Admin Center, click on Recipients >> Migration
- Now, go to New (+) option and choose Migrate to Exchange Online
- Select IMAP migration and press Next button
- In Select the user’s screen, you need to click on Browse
- Select CSV file that created previously and press Next
- After validation, O365 will show the Gmail mailboxes and click Next
- You should continue with default values on IMAP migration configuration window and click Next button
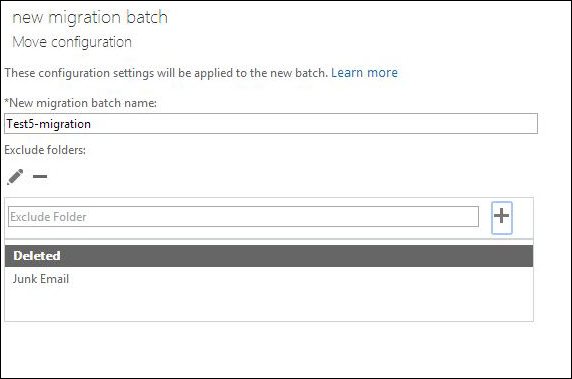
- On the Move configuration page, type the name of the migration batch inside the box. Additionally, you must provide folder names which you need to exclude. Click Add(+) icon and insert them to the exclude list
- Lastly, on the Start the Batch page, you need to provide all the required details and start the migration process

Step 6: Update DNS Records to Directly Migrate G Suite to Office 365
-
- From Admin Center, you need to click on Settings
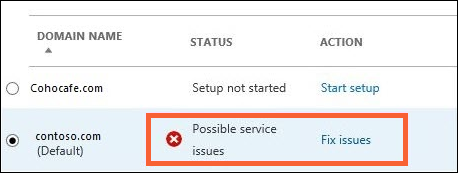
- Then, choose Domains >> select your domain name. Now, it will show ‘Setup in Progress’
- After that, you can view the Setup Completed notification

Note: After performing both manual & professional methods, I hope you will get your right answer with easy working steps. Or according to our expert recommendation go with a professional that is easy & quick and also a hassle-free solution for non-technical users.
Bringing It Altogether
Many companies want to migrate G suite to Office 365 account for fast performance, better management, and security options. Thus, in this blog, we have explained how to migrate G Suite business to Office 365 through the step by step manual procedure to perform data migration. Along with this, we have also described a simple and reliable solution to perform G Suite to Office 365 mailbox migration. Users can also rely on the provided approach because it is recommended by a technical expert from all over the world. For better details read the above article!
